Thursday 29 November 2012

Gluten Free Chocolate Muffins

As my daughter Ollie is gluten intolerant, I usually make her muffins or cupcakes for kindy. Some gluten free baked goods are stale and have an almost 'gritty' texture to them which I hate. So my aim here was to make a delicious, moist muffin for Ollie! 


If you are gluten/lactose intolerant, this recipe can be easily altered; I've listed alternatives at the bottom of this page.


Ingredients
  • 125g Milk or dark chocolate, chopped
  • 50g Butter, chopped
  • 4 Eggs, separated
  • 1/2 Cup milk
  • 2 Cups almond meal
  • 1 Tbs Cocoa powder
  • 1 Tsp vanilla essence
  • 1 Tsp baking powder
  • 1/2 Cup firmly packed brown sugar
  • 3/4 Cup chocolate chips

Method

  • Preheat oven to 220°c
  • Line a 12 hole muffin pan with muffin cases
  • Melt chopped chocolate and butter in the microwave on medium heat (ensure you are using a heat proof bowl) stirring after a minute. Allow to cool slightly.
  • Working quickly to prevent chocolate from solidifying, stir in egg yolks and gradually add the milk and vanilla essence.
  • Combine almond meal, sifted cocoa, baking powder, sugar and choc chips
  • Stir in chocolate/butter mixture
  • Beat egg whites in a large bowl until soft peaks begin to form
  • Gently fold in egg whites into chocolate almond mixture
  • Spoon into muffin cases until each is about 3/4 full
  • Bake for approximately 20 minutes, or until a skewer inserted into the middle of your muffins comes out clean
  • Allow to cool & enjoy!

Tips
  • If you are lactose intolerant, simply swap the butter for pure organic coconut oil, milk for lactose free versions or rice/almond milk, and use lactose free chocolate. Eggs can also be substituted for 1 1/2 tso xanax gum!


Tuesday 20 November 2012

Baked Raspberry Cheesecake


Cheesecake would have to be my all time favourite dessert.
This recipe is so simple & I'm positive that if you are a cheesecake fan, you'll love this!


Ingredients


  • 1 x 250g Packet Butternut snap biscuits
  • 3 x 250g Tubs Cream cheese 
  • 125g Butter, melted
  • 3/4 Cup raw caster sugar
  • 1 x Pack organic frozen raspberries
  • 3 x Eggs
  • 1/2 Tsp Pure vanilla extract
  • Rose pink food colouring
  • 1/4 Cup cream


Method

  • Grease and line a 24cm (base measurement) spring form pan
  • Place butternut snap biscuits into a food processor and process until finely crushed
  • Add melted butter and mix until combined
  • Transfer to the prepared pan and press firmly over the base and side. Cover with plastic wrap and place in the fridge for 30 minutes to chill.
  • Place raspberries, 1/4 cup caster sugar and 2 tbs water in food processor and blend until you have a smooth puree (if your mixture is too thick, continue to add water until the desired consistency is reached). 
  • Strain puree through a sieve to remove any seeds. Set aside
  • Preheat oven to 160°C. Place the cream cheese, cream and remaining sugar in a large bowl and mix with an electric mixer until smooth. Add the eggs one by one, and mix until well combined.
  • Add in vanilla extract, a few drops pink food colouring and raspberry puree, mix well.
  • Pour your cream cheese mixture over the biscuit base. Bake for approximately 50 minutes or until set in the centre. 

Tips
  • To test whether or not your cheesecake is ready, simply insert a skewer into the centre of the cake,  if the skewer comes up with some wet mixture on it, the cake needs to bake some more. If it is dry, then the cake is done!
  • You can replace the raspberry puree in this recipe for just about anything! You could try strawberry, blueberry, passionfruit, caramel, chocolate...I've even made a strawberry milk cheesecake before...yum!


Wednesday 14 November 2012

Stuffed Capsicum


  • Stuffed capsicum make a delicious meal on their own, or can be used as a side dish (as I usually do). They are super quick & easy & good for you too. Capsicum are very low in kilojoules, contain three times the vitamin C of an orange, are an excellent source of beta-carotene and one of the best sources of other carotenoids.

There are so many different fillings you can use to stuff capsicum, but the recipe below is my favourite!


  • Ingredients

  • 1-2 Large Red, Green or Yellow capsicum per person
  • 2 cups/250g Cooked brown rice (you can use microwave rice)
  • Olive Oil
  • 1 tsp garlic
  • 2 cups chopped mushrooms
  • 1 medium sized tomato, diced
  • 1 medium sized brown onion, finely chopped
  • 3 tbs tomato paste
  • 1 tsp Paprika
  • 2 tsp mixed herbs


Method

  • Preheat the oven to 200 °C fan-forced
  • Cut the top off each capsicum, using a teaspoon carefully remove the seeds.
  • Place capsicums on an oven tray lined with baking paper. Drizzle with olive oil, season with salt and pepper and roast in oven for 5 minutes or until just tender.
  • Heat oil in a frying pan over medium heat, cook onion, garlic & mushrooms for 3-4 minutes until tender.
  • Add cooked rice, tomato paste and a few tbs water, stir to combine and cook for one minute until reduced
  •  Add paprika and mixed herbs, season with salt and pepper
  • Fill capsicums with mushroom/rice mixture, top with either feta or cheddar cheese and place in oven. Roast for 10 minutes or until filling is hot & cheese has melted. Serve!

Amy Sedaris' Vanilla Cupcakes with (my) Buttercream Icing


These are my all time favourite vanilla cupcakes. Amy Sedaris also won second best in the city by New York Magazine - I totally understand why!

  • Ingredients

  • 1 1/2 stick (12 tbsp) unsalted butter
  • 1 3/4 cup sugar (I used 1 1/2 cup sugar)
  • 2 large eggs
  • 2 teaspoons vanilla
  • 1/2 teaspoon salt
  • 2 1/2 teaspoons baking powder
  • 2 1/2 cups flour (I used all purpose, but I guess you could use either all purpose or cake flour)
  • 1 1/4 cup milk


Method
  • 1. Preheat oven to 180 degrees
  • 2. In a bowl, whisk flour, baking powder, salt together
  • 3. Cream butter and sugar until light and fluffy.
  • 4. Beat in eggs, one at a time making sure it's well mixed
  • 5. Beat in vanilla
  • 6. Add flour mixture in 3 batches, alternating with milk. Do not overbeat.
  • 7. Divide batter evenly. Bake for 16 to 20 minutes and toothpick inserted into center comes out with a few moist crumbs attached.
  • 9. Cool on wire rack for 5-10 minutes then transfer cupcakes to cool completely


Basic Buttercream Icing

Makes enough for 30 cupcakes


Ingredients
  • 1 cup unsalted butter at room temperature
  • 6 to 8 cups confectioner's (icing) sugar
  • 1/2 cup milk
  • 1 teaspoon pure vanilla extract

Method

  • Combine butter, 4 cups icing sugar, milk, and vanilla. 
  • Beat until creamy for 3 to 5 minutes. 
  • Add remaining sugar, 1 cup at a time. Beat for 2 minutes after each addition.
  • Ice cooled cupcakes and decorate!


Monday 12 November 2012

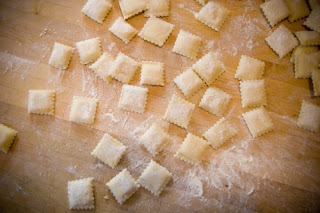
Sweet Potato, Pine Nut, Ricotta & Spinach Ravioli

My next recipe, I'm going to make for dinner tonight! Once again, this was originally a Dairy Free recipe, however as I have some Ricotta in the fridge at home, I'm going to add it to my ravioli.
Of course, it can be removed, or substituted for other types of cheese.


For the dough...
Ingredients
  • 3 cups unbleached flour
  • 1/2 teaspoon of salt
  • 2 eggs
  • 1/2 cup water


Filling...
Ingredients

  • 2 small/medium sweet potatoes, peeled & cubed
  • 1 300g tub Ricotta cheese
  • 1 bag (160g) of fresh spinach
  • 1/4 cup fresh grated Parmesan cheese
  • 3 Tbs toasted Pine Nuts

Method
  • Bring a medium sized pot of water to the boil
  • Add the sweet potato and cook for 10-15 minutes, or until soft
  • Transfer sweet potato to a large bowl and mash, set aside
  • Sift both flour and salt together in a large bowl
  • Make a 'well' in the centre of the flour and add eggs, using a fork break the yolks and beat slightly
  • Combine flour and eggs, gradually adding enough warm water to make a firm dough
  • Knead dough until smooth; wrap in cling film and let rest for approx 15 mins
  • Whilst the dough is resting, bring a small pot of water to a gentle boil and add spinach. Cook until the spinach has wilted and relatively soft. 
  • Drain water from the spinach and add to the sweet potato along with the ricotta, pine nuts and Parmesan. Season with salt and pepper.
  • Cut dough in half and roll each half on a floured board until very thin (a few mm)
  • Using a pasta wheel, cookie cutter (or even an upside down glass) cut out as many circles as you can from the pasta sheets.
  • Place about a tablespoon of the potato mix in the centre of each circle. To close, simply fold in half and seal closed using a fork. You can get creative here by making tortellini, or making different shaped ravioli.  I find the method used here is the easiest way.
  • Once you have filled and folded all of the ravioli, bring a large pot of water to the boil and add pasta.
  • Cook until they begin to float (this should only take a few minutes). If you like your ravioli a little crispy, heat a little olive oil in a pan, then add the cooked ravioli and pan-fry over medium heat for a few minutes on each side, or until lightly browned. Feel free to add your favourite pesto or pasta sauce and enjoy! 

Tips

  • There are SO many different fillings for ravioli, you could try things like dried porcini and fresh mushrooms, butternut squash/pumpkin, spinach and fetta - the list goes on!
  • For those wanting a more traditional shaped ravioli, instead of cutting circles out and folding over, simply roll half of your dough out in a rectangular shape, place evenly-spaced spoonfuls of filling on the dough. Roll the second half of the dough out, replicating the size and shape of the first. Brush a little bit of water in between the spoonfuls of filling, then place the second sheet on top and press to seal. Cut out ravioli with a sharp knife or a pasta wheel. To make extra-sure they are sealed, press the edges with a fork. 
  • If you don't have the time to make home made pasta, you can cheat here by using store bought Gow Gee pastry wrappers. These are available in most supermarkets in the cold food section.
  • Ravioli can be frozen, so you always have a quick meal ready to go!

If anyone would like a gluten free/vegan version of the dough and filling, please just let me know!


Sunday 11 November 2012

Dairy Free Coconut Ice Cream

As one of my favourite things to eat is icecream, and I love anything coconut, I've decided that my first recipe will be Vegan/Dairy Free Coconut Icecream! Let me tell you, it's delicious.


For this recipe, I make my own coconut milk. 

Don't stress, it's really simple & can be used as your every day milk.

It's a far better alternative to cow’s milk, rice, soy or other processed milks. 
Unfortunately, the store bought versions of coconut milk are lined with BPA and many have added sweeteners & preservatives. Plus, home made tastes so much better!


Coconut Milk...

Ingredients
  • 4 cups of water
  • 1.5-2 cups of unsweetened shredded coconut (can use packaged or fresh)
Method
  • Heat water, but don’t boil. 
  • Place both coconut and water in a food processor or blender. 
  • Blend on high for a few minutes until thick and creamy.
  • Pour through a sieve to remove any larger pieces of coconut.
  • Drink immediately or store in the fridge. Should be used in 3-4 days after making for best flavour and texture. Since there are no preservatives or fillers, the “cream” of the coconut milk may separate on the top if stored in the fridge. Just shake or stir before using.


Coconut Ice cream...
Ingredients
  • 4 cups home made coconut milk (recipe above)
  • 1/2 cup Raw Caster Sugar
  • 1/4  Teaspoon coconut oil flavouring (I love Dram Lorann which you can buy from most cake decorating suppliers - if you cannot find flavouring oil, just use regular extract or flavouring)
  • 1 1/2 Cups unsweetened coconut flakes
Method
  • Combine the coconut milk and sugar in a bowl & whisk until sugar has dissolved
  • Mix in coconut oil and flakes, mix well
  • Place in freezer for around 3 hours, stirring occasionally
  • Top with toasted coconut chips, or flakes (optional)
  • Serve & enjoy! 


Tips
  • If you are clean eating, or even just trying to reduce your calorie intake, you can replace the sugar with 1/3 to 1/2 cup of honey. Opt for a mild organic version if possible
  • If you are not lactose intolerant/vegan, you can also add about 1/2 a cup of thickened cream. This helps to give a smoother, creamier texture as home made icecream has the tendency to go a little icy sometimes!
  • If you cannot find any coconut flavouring/oil/extract, just use vanilla! It will give the icecream an almost 'marshmallowy' flavour. 
  • If you don't like coconut flavour, this recipe is so simple to edit! You could replace the coconut flakes for cocoa/cacao powder, mashed banana, Strawberry milk flavouring, powdered coffee etc. There are plenty of different options!